With 12 years of restaurant experience I’ve seen the good, the bad, and the very ugly when it comes to food temps. I cannot stress enough how important temping foods, especially meat, is to your family’s safety. In the biz these foods are known as “hazardous” because if not cooked correctly they can be exactly that.
The good news is that taking meat temperatures is easy peasy lemon squeezy! Bacteria won’t have a fighting chance if you arm yourself with the right weapon! It requires just one small piece of equipment that you can pick up in so many convenient places; grocery stores, kitchen stores, butchers, and of course online (hello Amazon Prime). Food thermometers are cheap, easy to store, easy to clean, and easy to use. I spent most of my restaurant years playing the calibrating game with old school dial food thermometers but you don’t have to! Digital instant read thermometers are available on the fly!
Now you can just stick it in the meat all willy nilly and still get a decent read on what the temp of your meat is. However if you like to do things accurately and look super cool here’s the low down on getting an exact read!
Prepare: Make sure your thermometer has been sanitized with hot water (158°) to kill any bacteria from other foods you may have temped.
Technique: The more thermometer that is inserted into the meat, the more accurate the read. Therefore I prefer to pick up the meat with tongs and hold it so that I am putting the thermometer in the side. If you go in from the top or bottom, depending on the piece of meat, it could only utilize and inch or so of the thermometer. If you are temping a big honking steak or roast, simply use the tongs to roll the meat so that the side is available to temp.
Step 1: Insert the food thermometer where the thickest part of the meat is SLOWLY. The meat is already dead, no need to stab it.
Step 2: Watch the temperature carefully, the temp will rapidly rise as you pass through the outer edge of the meat.
Step 3: Keep pushing until the temperature starts to go DOWN. Now you need to need to pay ultra close attention.
Step 4: Take note of the temp right now and then push a tad bit more until the temp starts to go up again.
Step 5: Pull back until you find the lowest possible temperature. This is your actual internal temp.
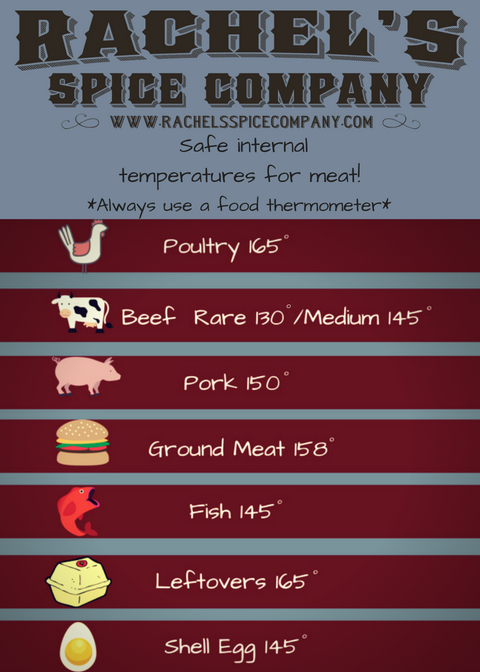
Repeat until the internal temp is what you are looking for. Feel free to refer to the handy chart I made!
Science! Hopefully now you see that if you just stick the thermometer in you are getting a so-so read. The meat is going to be coolest (read that the least cooked) in the very center of the thickest part. When the thermometer has passed all the way through the center the temperature starts to go back up again because we have passed the thickest part. The thinner parts will cook faster and therefore are not accurate to the whole piece of meat.
This whole process takes about 30 seconds so just because I broke it down into 5 crazy tiny steps don’t think it takes a long time.
You’re friends and family will be so impressed by your uber professional cooking skills! Added bonus: no one will get sick, yay!
Now that you’re ready to grill check out Old Glory Dry Rub, it is seriously my favorite grilling flavor!