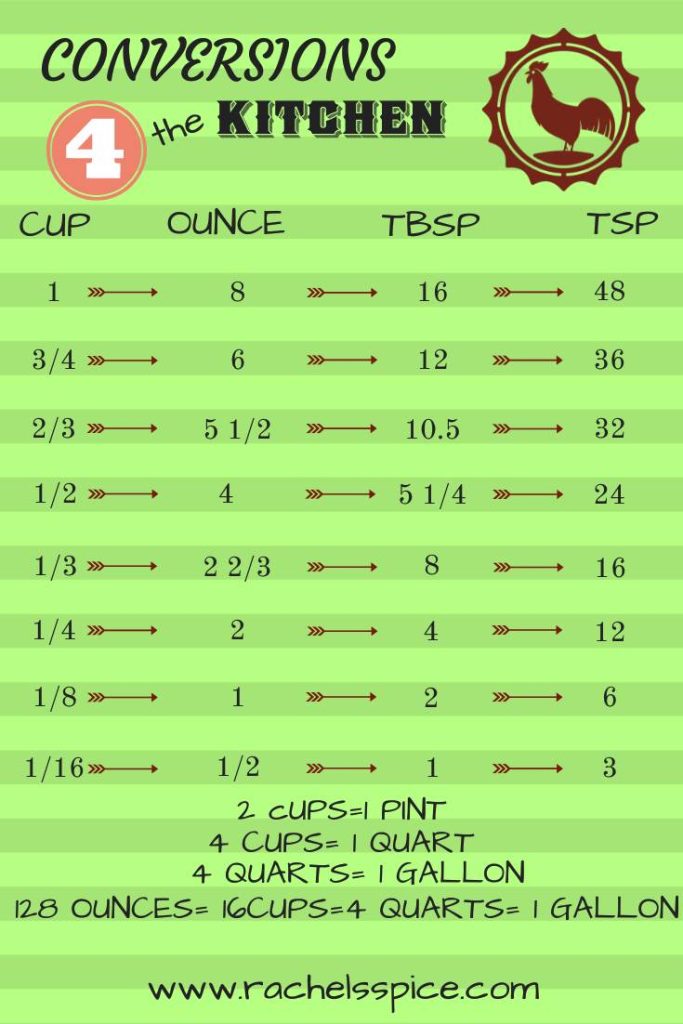
Kitchen conversions are the cornerstone of creating and manipulating recipes, please enjoy my handy graphic! Back in the day I had a very sloppy version taped to my recipe binder. I hadn’t even finished writing this blog and my Mom had already asked for a copy!
OK so as a former English teacher, “Yay Math!” has never EVER left my lips. BUT when I was chest deep in a busy restaurant I had to learn. It’s a special breed of calculation and I fondly refer to it as kitchen math. At the height of my tour I needed a calculator to give change (no joke, it’s so embarrassing) but I could tell you how many tablespoons were in that 6 ounces right off the bat (the answer is 12 tablespoons). This is especially helpful when making recipes larger or smaller. I would tend to convert everything to ounces so that I could price it out and then re-write my recipe with the accurate weights and measures. I’ll talk about weighing your ingredients in another post, it is the ultimate way to step up your baking game!
One note about this conversion business. When you are converting between these measures it gets messy. I have rounded to the nearest easily measurable point in my chart. For example, 2/3 cup is actually 10.6 tablespoons. Have you ever tried to measure out 10.6 tablespoons? Please don’t. It’s just not worth the hassle. Call me crazy but I go with 10.5 and I’m good to go. Also, liquid to dry gets tricky too. I tend to measure liquids and weigh dry ingredients. 1 physical cup of flour can vary greatly in actual volume depending on how it is packed and if you scooped out of the bag with the cup or poured into the measuring cup from the bag. I highly recommend that you NEVER use the cup you are measuring with to scoop dry ingredients. It can mess with the distribution of the ingredient. So if you are using adorable little measuring cups for your flour and sugar just take care with how you pack it in and always level it off.
Now a note about wet ingredients. Remember checking the meniscus in your beaker? Yes all the way back to what 8th grade science. This happens because the molecules in the liquid clings to the sides of the measuring cup more than they cling to each other. So we have to make sure we are measuring at the bottom most part of the top of the liquid.
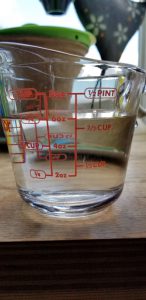
So bend down and look at where the liquid is in the measuring glass. You’ll most likely notice that the liquid is higher on the edges and lower in the middle. It is so slight but it does make a difference!
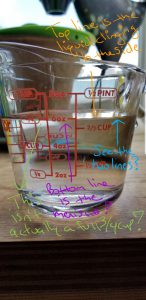
I really love my Galaxy note and took the liberty to go all out teacher. Measure your liquid at the bottom of the concave. Science! This is the main reason why I LOVE using glass measuring cups for my cooking adventures that rely on accuracy, like Christmas cookies and breads.
So that’s it for today. I hope you enjoyed geeking out with me over conversions and the elusive meniscus! So now you can be a culinary math whiz AND properly measure liquids!
Food Nerds Unite!
Have a great weekend!